Wall Panel Moulding: Styles, Costs and How to Plan a Room
Flat, builder-grade walls are the reason many finished rooms still look unfinished. Wall panel moulding fixes that with trim, caulk, and paint rather than construction: no drywall comes down and nothing structural changes. The part that trips people up is not the cutting — it is choosing a style, a height, and a spacing that actually fit the room. Plan those three things on paper first and the install is a weekend job.
Quick Facts
- Easiest DIY style: picture-frame moulding (applied trim frames, no panels to build)
- Typical wainscot height: 32 to 42 inches, roughly one-third of the wall height
- Typical frame width: 24 to 42 inches, with 3 to 5 inches between frames
- Typical DIY materials cost: about $1 to $3 per linear foot of trim, before paint
- Tools that matter most: miter saw, tape measure, level, brad nailer, caulk gun
- Best paint finish: satin or semi-gloss trim paint over a primed surface
The Main Styles, and Where Each One Works
Picture-frame moulding. Rectangles of thin trim applied straight onto the drywall, painted the same color as the wall. Nothing is recessed and nothing is built — the frame is the decoration. It suits living rooms, dining rooms, and bedrooms, full height or as a lower wainscot row, and it is the cheapest and most forgiving style to install because small gaps disappear under caulk.
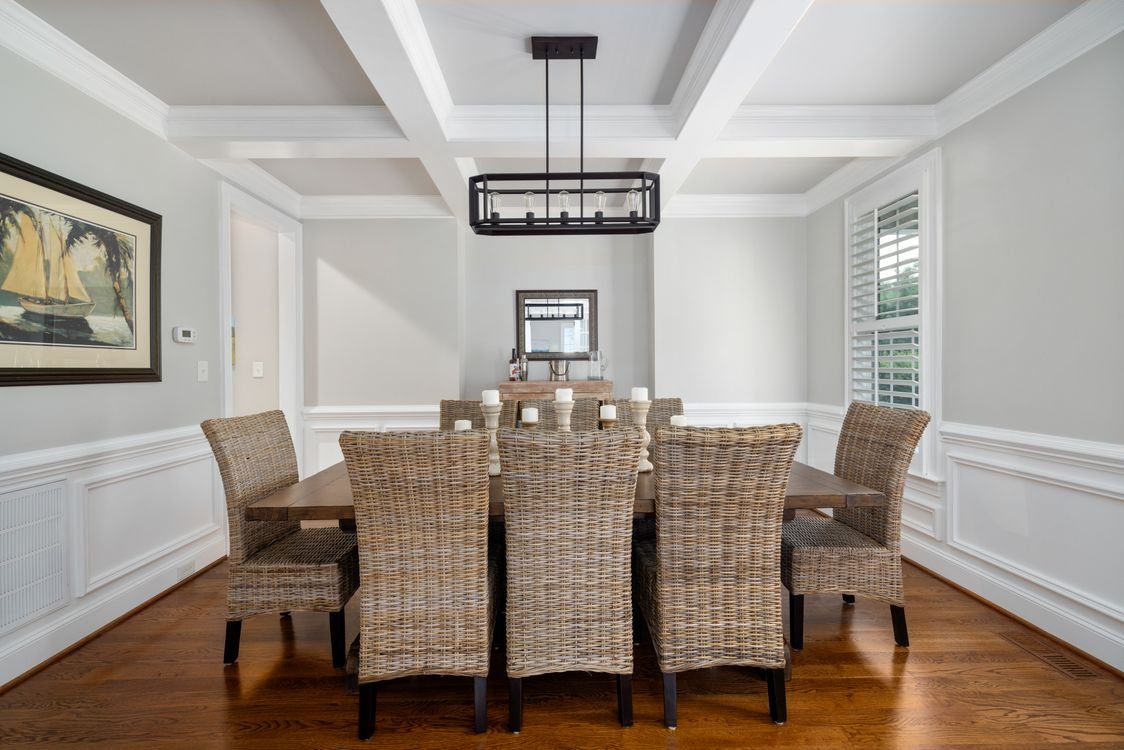
Raised-panel wainscoting. The traditional dining-room look: a chair rail on top, stiles and rails below it, and a raised panel inside each frame. It reads formal and is the most expensive route, whether you build it from sheet goods and trim or buy panel systems. Real carpentry skill or a pro budget is expected here.
Flat-panel (Shaker) wainscoting. Same structure as raised panel, but the panel is a flat sheet set inside the frame. Cleaner lines, pairs well with both traditional and modern furniture, and a realistic DIY project if you can cut sheet goods square.
Board and batten. Wide vertical boards (or just vertical battens over painted drywall) with a horizontal cap. The gaps between battens run about 12 to 18 inches. It handles entryways, mudrooms, and bedrooms well, hides minor wall waviness better than thin trim, and the vertical lines make low ceilings feel taller.
Full-height panels. Picture frames or board and batten carried to the ceiling. Dramatic in a dining room or behind a bed; in a small room with 8-foot ceilings it can feel like a box if the frames are oversized, so keep panels narrower — 20 to 30 inches.
What It Typically Costs
Costs below are typical US ranges for materials; prices move with trim material (MDF is cheapest, then primed finger-joint pine, then solid wood or PVC for bathrooms) and store. One 12-foot wall is the comparison unit.
| Style (one 12-ft wall) | Typical DIY materials | Typical pro install |
|---|---|---|
| Picture-frame moulding | $60–$180 | $400–$900 |
| Flat-panel wainscoting | $150–$350 | $800–$1,800 |
| Board and batten | $120–$300 | $700–$1,500 |
| Raised-panel wainscoting | $300–$600 | $1,500–$3,500 |
On top of the trim itself, budget for construction adhesive (about $5 to $8 a tube, one tube per wall), a box of brad nails, paintable caulk, wood filler, and paint. Already owning the miter saw and nailer is what keeps the DIY column low; renting both for a weekend typically adds $75 to $120. With pro quotes, confirm whether painting, caulk, and fill are included, or trim only.
Plan the Layout on Paper First
Measure the wall’s full length and the ceiling height, and note every outlet, vent, switch, and door casing. Frames must land clear of all of them, so these positions shape the layout too.
Set the height. For a wainscot row, the top of the chair rail usually sits at one-third of the wall height: about 32 inches on an 8-foot wall, 36 inches on a 9-foot wall. Dining rooms can go a little higher, 36 to 42 inches, so the rail clears chair backs. For full-height picture frames, leave 5 to 7 inches between the top of the frame and the crown or ceiling line, and the same at the bottom above the baseboard.
Solve the spacing with one formula. Decide your margins — typically 5 inches in from each corner or casing, and 4 inches between frames — then divide what is left by the number of frames. Worked example for a 144-inch wall with 3 frames: 144 − (2 × 5) − (2 × 4) = 126 inches, divided by 3 = three frames of exactly 42 inches each. Equal frame widths and equal gaps are the whole trick; the eye forgives almost anything except uneven spacing. If the math leaves a leftover inch or two, add it to the margins, never to one frame.
Mock it up before cutting. Mark the full layout on the wall with painter’s tape at real size and live with it for a day. This is where you find the frame that bisects a thermostat. Two slim frames behind a console table on a narrow entry wall read as custom work; one oversized frame reads as a mistake.
Tools and Materials
- Tape measure, pencil, and a 4-foot level (a laser level speeds up long walls)
- Miter saw, or a miter box and backsaw for a single wall
- Brad nailer and 1.5- to 2-inch brads, or a hammer, finish nails, and a nail set
- Construction adhesive rated for trim
- Paintable latex caulk and caulk gun, wood filler, 120-grit sandpaper
- Trim stock: for picture frames, a profile about 1.5 to 2.5 inches wide with one flat edge that sits flush to the wall; buy 10 to 15 percent extra for bad cuts
- Primer and trim paint
Install Order, in Brief
- Paint the wall first if it is getting a new color; touch-ups are easier than cutting in around finished frames.
- Snap or pencil your layout lines from the tape mock-up, and check them with the level — walls and ceilings are rarely square, so trust the level, not the ceiling line.
- Cut the longest horizontal pieces first, with true 45-degree miters. Dry-fit every frame on the floor before it goes on the wall.
- Run a thin bead of adhesive on the back of each piece, set it on your lines, and pin it with brads every 12 to 16 inches, angling pairs of nails slightly so they hold in drywall where no stud is present.
- Caulk every inside seam where trim meets wall — this single step is the difference between DIY-looking and built-in-looking — then fill nail holes, sand, and spot-prime the filler.
- Paint the trim and frames. Satin or semi-gloss in the same color as the wall is the current standard for picture frames; a true trim white or a soft off-white like the ones in our antique white paint color guide suits wainscoting with a chair rail. Two thin coats beat one thick one.
Common Planning Mistakes
- Frames sized to the trim you bought, not the wall. The layout math comes first; the shopping trip comes second.
- Ignoring outlets. A frame edge landing half an inch from an outlet plate looks wrong forever. Shift the whole run, not just one frame.
- Skipping the caulk. Uncaulked trim shadows read as gaps at every viewing angle.
- One accent wall in a room that needed two. In dining rooms and primary bedrooms, wrapping the moulding around all walls usually looks more finished than a single feature wall.
- Copying a height from a photo. A 42-inch wainscot that suits a 10-foot ceiling crowds an 8-foot room. Use the one-third rule for your own ceiling.
Planned on paper, wall panel moulding is one of the few projects where the cheap version and the expensive version are separated mostly by layout and caulk, not materials. Get the heights and spacing right for your room, and even the simplest picture-frame layout will look like it was always there.
Frequently Asked Questions
How high should wall panel moulding go?
For wainscoting, set the top of the chair rail at roughly one-third of the wall height — about 32 inches for 8-foot ceilings and 36 inches for 9-foot ceilings, up to 42 inches in dining rooms. For full-height picture frames, stop the frames 5 to 7 inches below the ceiling or crown moulding.
Can you install panel moulding with glue only, no nails?
On smooth, flat walls, construction adhesive alone can hold lightweight MDF or PVC picture-frame trim, and it is a reasonable option in rentals if you accept that removal will damage paint and possibly drywall paper. For wood trim or any wainscot with a chair rail, use adhesive plus brads — glue-only rails eventually creep and open at the joints.
What is the cheapest style to do yourself?
Picture-frame moulding, by a wide margin. It is trim, adhesive, caulk, and paint only — typically $60 to $180 in materials for a 12-foot wall — and it needs no sheet goods, no panel building, and no table saw. Board and batten is the next cheapest.
Does every wall in the room need the same panels?
No, but the treatment should feel deliberate. A single full-height panel wall behind a bed or dining table works when the other walls are plain. Wainscot-height moulding, though, generally looks better wrapped continuously around the room, because a chair rail that stops mid-room draws attention to where it ends.
What paint finish is best for panel moulding?
Satin or semi-gloss. Both scrub clean, and the slight sheen difference against eggshell or matte wall paint is what makes the frames read as architecture instead of stripes. Always prime bare MDF edges and filler first, or the paint will soak in unevenly and flash through the topcoat.
3 Comments
Comments are closed.